
No WordPress site is complete without attractive images and banners. As per the size and layout of the pages, the images and banners you upload will be of different sizes and dimensions.
But when you are confined to upload files of only a particular size or lesser to your WordPress website, WordPress will bring in an error message. It will tell you that the maximum file upload size is xx MB. This issue will restrict you from adding large files via the media uploader or to install some themes or plugins which exceeds the upload size.
The only solution to upload bigger files to WordPress is to increase the maximum file upload size. You can know your file upload maximum size by going to Admin Dashboard ⇾ Media ⇾ Add new.

This article will help you to learn how to change the maximum file upload size in WordPress.
Introduction
WordPress has its own media uploader. It helps you to upload files directly to the website without the aid of an FTP client. Just a few buttons and you have your file uploaded.
It is both fortunate and helpful that WordPress is using PHP to upload files. And unfortunately, there is this maximum file upload size. In this article, we will discuss 5 methods to increase file upload limit, one of which can help you through.
Required Access
- Access to Hosting Control Panel
- Access to WordPress Dashboard
Methods in Brief
- Increasing max upload size in .htaccess
- Configuring php.ini file
- Modifying wp-config.php file
- Changing maximum upload size in cPanel
1. Increasing Max Upload Size in .htaccess
With most hosting providers, will have access to edit the .htaccess file.
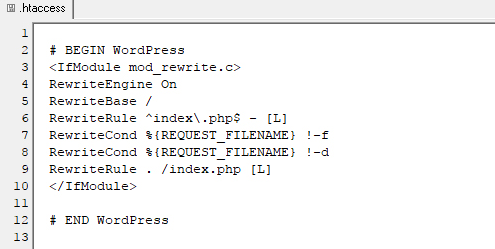
Select the .htaccess file and click on Edit button. Make changes in the php_value upload_max_filesize rule to increase the maximum upload file size. You can try pasting the following code at the bottom of the file for ease:
php_value upload_max_filesize 128M
php_value post_max_size 128M
php_value max_execution_time 300
php_value max_input_time 300
2. Configuring php.ini file

While using a VPS hosting for your WordPress website, this is the most proper method for increasing the upload limit. If the .htaccess plan fails, you can try making changes to the php.ini file. Look for the php.ini file in the root directory. If you cannot see it, create a new one and paste the following rules to the file:
upload_max_filesize = 128M post_max_size = 128M max_execution_time = 300
| Also Read | 2 Minute Fix for Briefly Unavailable for Scheduled Maintenance Error in WordPress |
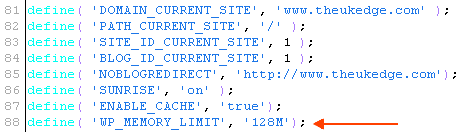
3. Modifying wp-config.php file
In case both of the above methods fail, you can try editing the wp-config.php file. Increase the maximum file upload size by adding the following line to the wp-config.php file. Access WordPress from the FTP client, find the wp-config.php file and add the line at the bottom.
define('WP_MEMORY_LIMIT', '128M');
After adding the line, the wp-config.php file should look like this:
4. Changing Maximum Upload Size in cPanel
Leave the earlier options if your service provider is using cPanel and allows making changes to PHP settings. You can effortlessly increase the file upload size using cPanel. All you have to do is the following:
1. Access the cPanel and click on ‘Select PHP Version’.

2. Click on ‘Switch to PHP Options’ on the right side.
3. Make necessary changes to the ‘post_max_size’ and ‘upload_max_filesize’ values.

4. Click on ‘Save’ to save the changes.
If you’re a regular WordPress user, there is a chance that you have encountered the max. upload size issue at least once in your WordPress time. Now that you have learned different methods to increase the maximum file upload size, you can now upload files of any size to your WordPress pages.
Hope you liked reading the article. For more updates on blogs and WordPress products, follow us on Facebook, YouTube, and Twitter. Visit ThemeHigh to know more about our WooCommerce and WordPress plugins.