Before WordPress 5.0, things were not very different, except one. And this one thing that has made a big change is the default content editor of WordPress. This change can be mentioned as one of the largest that has happened to WordPress in a very long time.
With the 5.0 update of WordPress, they changed the default TinyMCE Editor and replaced it with a Block Editor. They called it Gutenberg.
With Gutenberg completely replacing the old editor, your way of creating WordPress contents is really going to change. To ease the transition, let’s go through a basic guide on how to use this all-new Gutenberg Block Editor from WordPress.
What is Gutenberg?
WordPress had officially named its new block editor project as Gutenberg while it was still under development. However, they changed it to ‘the WordPress Block Editor’ or simply ‘the WordPress Editor’ as a part of its integration to the core software. We can similarly call Gutenberg as the Block Editor from now on.
Let’s have a look at the old school editor and the new block editor.

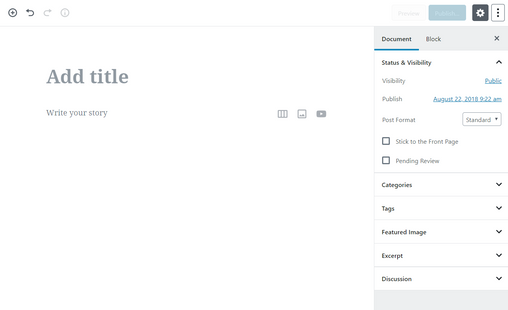
Now, what is that has changed a lot?
As you can see, unlike the old editor, every addition in a block editor depends on blocks. Instead of a single field to add everything, the Gutenberg block editor has a separate block for each element you add.
You can enjoy a completely different editing experience using the Gutenberg block editor. The block-based approach of the editor helps to add content in an easy and appropriate way, thus minimizing the time spent on it.
Even though WordPress is currently focusing only on the content creation part, they are getting ready to integrate it into templates and eventually to the full website customization.
In future, all you will be doing to build your site is insert the elements in blocks wherever necessary.
How the WordPress Block Editor Works
A few lines above, we had talked in brief about the WordPress block editor. You should perhaps know what blocks are and what they do.
Looking from the TinyMCE editor’s point of view, a post editor was a single edit field to type, insert things, formatting, etc. and all these were done inside this single editor box. The block editor replaced this single edit box with a lot of individual ‘blocks’.
Say, if you want a table in your content, you had to add it using a separate table plugin. With the block editor, you can easily add a table block, select your columns and rows, and start adding content.

What is a Block?
A block can be anything, say, it can be any of the following:
- Text
- Images
- Embedded Videos
- Tables
- Call-to-Action Buttons
- Widgets (that you use in the sidebar)
Each block acts simultaneously that each of them can be manipulated on an individual basis. Moreover, developers can create their own custom third-party blocks and make them available through plugins for better flexibility.
Using the New WordPress Block Editor
The new WordPress block editor Gutenberg is very much inherent and flexible. Although it has a huge difference in the look-and-feel compared to the old editor, it does everything that the old editor has done.
Now, let’s look at the basics you are used to with the old editor and how the same can be used via the new Gutenberg editor.
Creating a New Blog Post/Page
This one thing has not changed from old times.
For creating a page, go to Pages » Add New.

Both of these will launch the new WordPress block editor.
How to Add a Block in the Block Editor?
The first block of each WordPress post/page is its title.
After adding the title, move the mouse down or use the tab key on the keyboard to start writing.

The block after the title is a paragraph block by default. Thus, you can simply write straight away.
Still, if a paragraph is not what you want, click on the ‘Add new block’ button on the top-left corner, below an existing block, or on the left of a block.

Clicking the add button will display a menu with a search bar on the top followed by commonly used blocks.
You can search between the tabs to find a required block, or just type in the search box to quickly find one.

Working with Blocks in The Block Editor
Every block has a toolbar on top of it, which comes with buttons that change specific to the block you choose to edit.
Say, if you are working on a paragraph block, the buttons will be for text alignment, bold, italics, underline, strike-through, insert link, etc.

Other than this toolbar, every block will have their own block settings, which will be displayed in the rightward column of the edit screen.

Blocks can be easily moved up and down using drag-and-drop.

Saving and Reusing Blocks in The Block Editor
Blocks can be saved and reused accordingly in Gutenberg. This feature of the block editor is always helpful for the bloggers who frequently spend their time adding specific content snippets to articles.
Just click on the menu button on the right side corner of the block toolbar. Choose ‘Add to reusable blocks’ from the menu.

Provide a name for your reusable block when prompted, and save the settings.

The block will now be saved as a reusable block in the Gutenberg editor.
Now let’s see how to add a reusable block into any other WordPress post or page.
Click to edit the post or page where the reusable block needs to be used. From the edit screen, click the ‘Add Block’ button.
Choose your block from under the ‘Reusable’ tab. It can also be located using the search bar.

To see a quick preview of the block, hover the mouse over the block. All you have to do is click on the block to insert it into the page/post.
The reusable blocks will be saved in your WordPress database from where you can manage them from the ‘manage all reusable blocks’ link.

You will now reach the block manager page. Here, you can edit/delete your reusable blocks. Also, export your reusable blocks to use them on your all other WordPress sites.

Publishing and Managing Options in The Block Editor
WordPress posts are rich in metadata. Metadata contains information including the publish date, categories and tags, featured images, etc.
You can find all of these options placed in the right side column of the editor screen.

Plugin Options in The Block Editor
WordPress plugins have access to the block editor’s API. Therefore, the plugins can integrate their settings from inside the edit screen.
Many popular plugins have already made them available through editor blocks.
Adding Some Common Blocks in New Editor
The new editor is all set to perform everything you had done using the classic editor. The difference is using Gutenberg you’ll be doing it way more quickly and elegantly.
1. Adding an image in the new WordPress Block Editor
You can simply upload an image or select it from the media library using the ready-to-use image block in the editor.