You are a regular WordPress writer who uses Gutenberg and adds the same text or elements to your WordPress posts frequently. Adding the same things, again and again, is a tiring process. Now, you can ease this using reusable content blocks.
As a regular writer for your website, you will be having stock content often added to almost all pages and posts. That may be bits of text such as an introduction or a disclaimer. Or it may be images, links, buttons, text formattings, or even a signup form for your newsletter.
Whichever content you are repeatedly writing, you can ease it using the reusable content blocks. They will help to save a lot of your time and labor, all while helping you become more productive.
In this article, we’ll discuss how to create a reusable block in WordPress Block editor a.k.a. Gutenberg. We will also discuss how to add reusable blocks into the WordPress posts and also to export them for use on other WordPress websites.
What is a Reusable Block in Gutenberg?
Reusable blocks are content blocks that are saved individually for use later. Bloggers often use the same content snippets in more than one articles and blogs for purposes such as call-to-action, social media links, etc. Usually, they save these snippets using a text editor in their computer and copy-paste them later.
The Gutenberg editor lightens this issue using Reusable Blocks. With the new Block Editor, you can save the content snippets inside the editor and reuse them anytime and anywhere simultaneously. See some instances where you can make use of a Reusable Block:
- To ask your visitors to follow your social media profiles in the tail end of every article you write.
- To add a call-to-action button in your WordPress pages and posts.
- To save and reuse tables.
- To quickly add feedback forms to your page.
- To manually add affiliate banners inline, and much more…
Now, let’s look at how to create reusable content blocks for WordPress!
Creating Reusable Blocks in Gutenberg Editor
Blocks in the Gutenberg Block Editor are individual content elements in the WordPress Block Editor. These elements can be saved as reusable blocks individually.
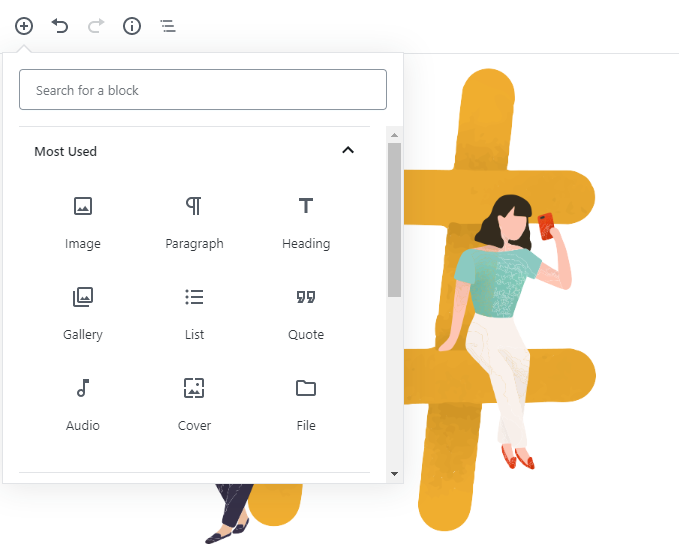
The first thing to do is open a post for edit (a new or existing one). On the edit page of the post, you’ll see the add new block buttons if you are using the Gutenberg editor. Click the Add new block button and choose the block type which is suitable for your content.
Here, we will try saving a few lines in a paragraph block. After adding the paragraph block, type in the content you need to reuse. Give styling and formatting to the content from the block’s toolbar and settings.

After completing the content editing, open the three dots menu in the block toolbar to find the ‘Add to Reusable Blocks’ option.

You will be prompted to give a name for the reusable block. Provide a name that tells what it does and is easily identifiable later.

After typing the name, click the save button to convert the block to a reusable block and to store it for use later. The block is saved in the WordPress database with all the settings included.
| Also Read | WordPress Proposes a New Block Directory for Single Block Plugins |
Adding Reusable Blocks Later
We converted a paragraph block into a reusable block. Now, let’s see how to use reusable blocks in WordPress pages and posts.
For this, create or edit another post in which you need the reusable block. In the Edit Post window, click the ‘Add new block’ button.
Scroll down the Add new block window to find the ‘Reusable’ tab. Open the accordion to find your block. You can also search in the search bar to find the block.

Hover the mouse to see a preview of the reusable block. Click on the block icon to insert it in the post. Now, the block will be visible in your post in the editor. You can rename and edit the block by clicking the Edit button.
But, this changes the block in every page and post you have used it. Instead, if you need to change it in a single post, click on the three dots toolbar and select ‘Convert to regular block’.

The block will now be converted into a normal block, where you can edit it for that single post.
Managing Blocks
All reusable blocks can be managed by clicking on the Manage All Reusable Blocks at the bottom of the Reusable tab in the Add new blocks section.

Clicking on the Manage All Reusable Blocks will take you to the block manager. Here, you can edit, delete, export, or import your blocks.

Import and Export Blocks
You can easily export reusable blocks from the block manager. When you hover on a block, you can see an ‘Export as JSON’ link. By clicking on the link, the reusable block will be saved as a JSON file.

After going to another WordPress site admin’s block manager page, you can import the exported reusable blocks by clicking on the ‘Import from JSON’ button above the blocks list.
We hope we informed you well on the use of Reusable Blocks. Hope you make use of them well! You can always post your doubts and concerns in the comment box.
If you like the article, please feel free to follow us on Facebook, Twitter, LinkedIn, and subscribe to our videos on YouTube. Happy WordPressing! 🙂